

Error Code 1125 For Epson SC-S30600
| Error Code | Error Name | Cause | Check Item | Remedy |
| 1125 | CR HP detection error | The CR Unit does not respond to the CR HP Sensor, or the sensor failed to detect the home position. CR HP Sensor failure False detection of the home due to paper jam or any other obstacle Misreading of the CR Scale CR Lock is damaged. |
1. Is the CR HP Sensor out of order? Does the light shielding plate react to the sensor? 2. Is there any paper jammed inside the printer? 3. Does the CR Scale have any scratches or dirt? 4. Does the CR Encoder work properly? Check it using the Service Program. 5. Does the CR Lock function normally? |
1. Replace the CR Encoder.
2. Re-install the CR Encoder. If it is faulty, replace it. 3. Clean the CR Scale using ethanol. 4. Replace the CR Scale. 5. Replace the CR Lock (Pump Cap Unit). |
How To Fix Error Code 1125 For Epson SC-S30600
Replace the CR Encoder
1. Unlock the CR Unit.
2. Remove the Wiper Cleaner.
3. Remove the Media Loading Lever.
4. Remove the Right Upper Cover.
5. Remove the Left Rear Cover.
6. Remove the Left Upper Cover.
7. Remove the Left Cover.
8. Remove the Right Cover.
9. Remove the APG Unit.
10. Remove the CR Motor.
11. Remove the CR Cover.
12. Remove the Damper Kit.
13. Remove the Print Head.
14. Remove the CR Scale.
15. Remove the CR Unit.
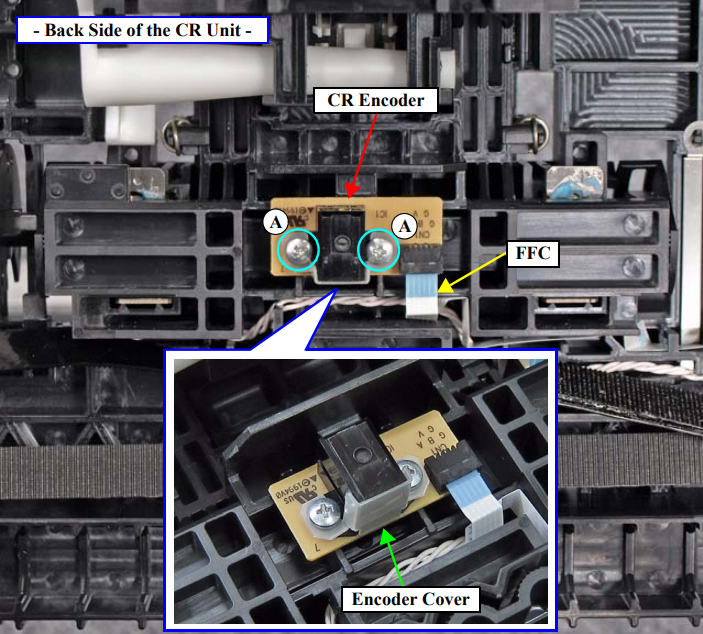
16. Remove the two screws, and remove the CR Encoder and Encoder Cover.
A) Silver M2.5×8 P-tite screw: 2 pcs
17. Disconnect the FFC from the CR Encoder.

Re-install the CR Encoder. If it is faulty, replace it.
Clean the CR Scale using ethanol.
Replace the CR Scale.
When replacing/removing this part, refer to “Adjustment Items and the Order by Repaired Part” and make sure to perform the specified operations including required adjustment.
Do not contaminate the surface of the CR Scale with ink,fingerprints, skin oil, or any other dirt. And be extremely careful not to scratch or damage the surface by letting it come in contact with the main unit frames or any other things. Doing so may result in malfunction of the CR Unit.
1. Unlock the CR Unit.
2. Open the Right Maintenance Cover.
3. Open the Left Maintenance Cover.
4. Open the Front Cover.
5. On the left side of the printer, remove the tension spring.
6. Move the CR Unit to the left end.
7. On the right side of the printer, disengage the CR Scale from the hook on the frame.


8. Release the CR Scale from each hook of the four CR Scale Holders.


9. Pull out the CR Scale from the CR Scale.


Replace the CR Lock (Pump Cap Unit).
1. Unlock the CR Unit.
2. Remove the Media Loading Lever.
3. Remove the Panel Unit.
4. Remove the Right Upper Cover.
5. Remove the Right Cover.
6. Move the CR Unit to a position over the platen.
7. Remove the screw, and remove the cable cover.
A) Silver M4x8 S-tite screw with built-in washer: 1 pcs


8. Open the clamp
9. Disconnect the cable from the three relay connectors (No.36, No.37, and No.79).


10. Remove the three screws that secure the Pump Cap Unit.
B) Silver M4x8 S-tite screw with built-in washer: 3 pcs
11. Remove the two Waste Ink Tubes from the joint, and release the tubes from the
clamp.
12. To prevent ink from dripping, insert the tip of the Waste Ink Tube into the hole
shown below.
13. Pull the Pump Cap Unit frontward to disengage the hook, and remove the Pump
Cap Unit avoiding contact with the CR shaft or any other parts.

